目的 自己本地日常使用的开发环境,一直没有对相关的环境部署进行总结,导致在卸载、更换电脑硬件、系统迁移等情况下需要耗费大量的时间去寻找配置流程,劳心劳力,容易踩坑。如果完全交给AI,顾虑太多,配置往往互相依赖,不如自己配置省时间,因此将一些常用的配置流程记录下来。
虚拟机ubuntu安装 不知道安装过多少遍了,以当前最新的26.04版本为例
安装ssh 更新软件包
安装ssh
1 sudo apt install -y openssh-server
检查ssh是否正常运行
1 sudo systemctl status ssh
如果没有正常运行
1 2 sudo systemctl enable --now ssh
防火墙相关的
1 2 3 4 5 6 7 8 9 10 11 12 13 14 15 16 17 sudo ufw allow sshsudo ufw resetsudo ufw delete allow 22/tcpsudo ufw delete deny 3306/tcpsudo ufw status numberedsudo ufw delete 3sudo ufw enable
注意:
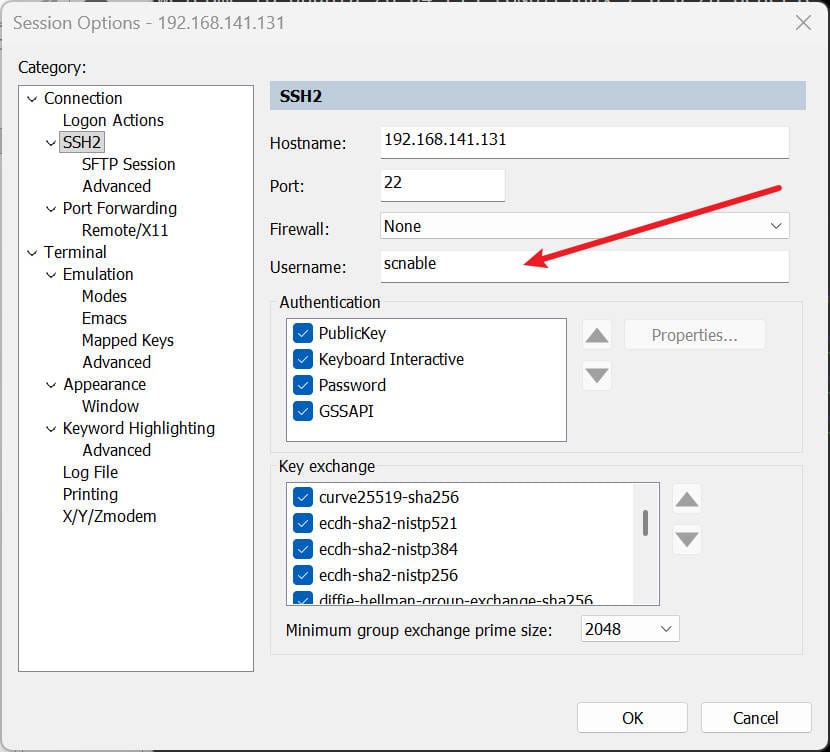
如果是使用secureCRT 进行登录,需要保持 新建的连接项用户名 和 建立连接时的用户名保持一致,不然即使建立连接时输入用户名和密码正确,也有可能登不上去,提示如下错误:
1
2
The server has disconnected with an error. Server message reads: A protocol error occurred. Change of username or service not allowed: (,ssh-connection) -> (,ssh-connection)
右键修改:
查看本机ip,建立ssh连接
安全配置
1 2 3 4 5 6 7 8 /etc/ssh/sshd_config Port 2222 PermitRootLogin no PasswordAuthentication no sudo systemctl restart ssh
常用管理命令
1
2
3
sudo systemctl restart ssh sudo systemctl stop ssh sudo systemctl disable ssh
其它问题:
我一般使用secureCRT在本地进行ssh远程,可能会出现08;end=…;exit=success08;start=…;hostname=…type=shell;cwd=类似的乱码,
具体原因见链接:
1
2
3
4
5
# 新版本的systemd,这个版本的systemd增加了一个叫80-systemd-osc-context.sh的脚本文件,它会向远程终端# 发送shell和命令的一些上下文信息 而远程工具还没有支持处理这种信息,就导致了这坨乱码 https://uapi-group.org/specifications/specs/osc_context/ https://systemd.io/OSC_CONTEXT/ http://juejin.cn/post/7569417374638997504 https://github.com/kingtoolbox/windterm/issues/3106
解决方法:
1
2
3
4
5
6
# 在~/.bashrc中添加以下内容 禁用systemd OSC 3008的扩展输出 __systemd_osc_context_precmdline() { :; } __systemd_osc_context_common() { :; } __systemd_osc_context_escape() { :; } PS0="" # 然后source ~/.bashrc
samb 1 2 3 4 5 6 7 8 9 10 11 # 安装Samba软件 sudo apt install samba # 查看Samba服务是否正在运行 / smbd是Samba服务器后台程序,负责管理Samba共享,而nmbd是NetBIOS名称服务器,负责提供网络浏览和名称解析 sudo systemctl status smbd nmbd # 如果没运行,手动启动。 sudo systemctl start smbd nmbd # 设置为开机启动 sudo systemctl enable smbd nmbd # 创建共享目录 # 编辑配置文件/etc/samba/smb.conf sudo vim /etc/samba/smb.conf
1 2 3 4 5 6 7 8 9 10 11 12 13 14 15 16 17 18 [ShareName] 共享的名称,这个名称在访问共享时显示,可根据需要更改 # 基础配置 comment = [comment] 描述性注释,访问所配置的资源时显示 path = [directoy path] 要共享的文件夹的绝对路径 available = [yes/no] 共享资源是否可用 browseable = [yes/no] 设置为yes使共享在网络浏览器中可见 # 用户权限 valid users = [username1],[username2],@[usergroupname] 允许访问该共享资源的用户,多个用户用,隔开,如果配置的是用户组前面加@ read list = [username1],[username2],@[usergroupname] 允许读该共享资源的用户 write list = [username1],[username2],@[usergroupname] 允许写该共享资源的用户 guest ok = [yes/no] 设置为yes允许没有有效用户账户的用户访问共享 # 访问权限 read only = [yes/no] 设置为no允许用户写入文件 writable = [yes/no] 是否可写入 directory mask = 0775 设置创建目录的访问权限 create mask = 0775 创建文件的访问权限
1
2
3
4
5
6
7
8
[share] comment = File share path = /home/scnable/VMshare available = yes browseable = yes valid users = scnable read only = no writable = yes
1
2
3
4
5
# 检查配置文件语法是否正确 sudo testparm /etc/samba/smb.conf # 消除警告 WARNING: The 'netbios name' is too long (max. 15 chars). [global] netbios name = smbserver
1 2 3 4 5 6 7 8 9 10 11 12 13 14 15 sudo systemctl restart smbdsudo ufw allow sambasudo smbpasswd -a [username]sudo pdbedit -a [username] sudo undo smbpasswd -L [username]pdbedit -x username smbpasswd -x [username]
中文输入法安装 参照文章Ubuntu 26.04 安装 Fcitx 5 与 Rime 并保持英文环境
NVM安装 管理node版本:博客网站以及ai等环境使用的是不同版本的node
直接参考网站教程:
1 https://www.nvmnode.com/zh/guide/usage.html
注意网站有些内容更新并不及时,安装前:核对最新的版本号以及命令
claude部署 win linux 博客网站自动化编译 本文著作权归 scnabla 所有。未经 scnabla 事先明确许可,禁止复制、转载、搬运、改编或再次发布,包括非商业用途。标注作者、注明来源或附原文链接,不代表获得授权。